Unlocking Nature's Powerhouse: Why Walnuts Reign Supreme
In a culinary landscape dominated by familiar spreads like peanut and almond butter, the humble walnut often remains an unsung hero. Yet, for those in the know, walnuts are not just another nut; they are truly a nutritional powerhouse, widely acclaimed as "nature's healthiest nut." Imagine transforming these nutrient-dense gems into a luxuriously creamy, **simple homemade walnut butter** that rivals (and often surpasses) its store-bought counterparts in both flavor and health benefits. This article will guide you through the effortless process of creating this exquisite spread and delve into why walnuts deserve a prime spot in your diet.
Walnuts are a unique nutritional star, distinguished by their exceptional profile of omega-3 fatty acids, specifically alpha-linolenic acid (ALA). This essential fatty acid is crucial for heart health, supports cognitive function, and plays a vital role in reducing inflammation throughout the body. Beyond omega-3s, walnuts are bursting with antioxidants and polyphenols – compounds that tirelessly combat free radicals, protecting your cells from damage and promoting overall vitality. Perhaps one of the most compelling reasons to embrace walnuts comes from groundbreaking research indicating that regular consumption may significantly impact long-term health. Studies suggest that individuals who consumed more than three servings of walnuts per week appeared to cut their risk of dying from cancer in half. This astounding statistic alone makes a compelling case for integrating this remarkable nut into your weekly routine, and what better way to do so than in a delicious, versatile butter?
The Irresistible Allure of Simple Homemade Walnut Butter
While commercial nut butters line supermarket shelves, few can match the purity, freshness, and superior taste of a homemade version. When you craft your own **simple homemade walnut butter**, you gain complete control over the ingredients, ensuring a product that is free from unwanted additives. This means no added oils, no refined sugars, and no preservatives – just the wholesome goodness of walnuts. For those adhering to specific dietary plans, homemade walnut butter is a dream come true, naturally fitting into gluten-free, Paleo, and Whole30 lifestyles.
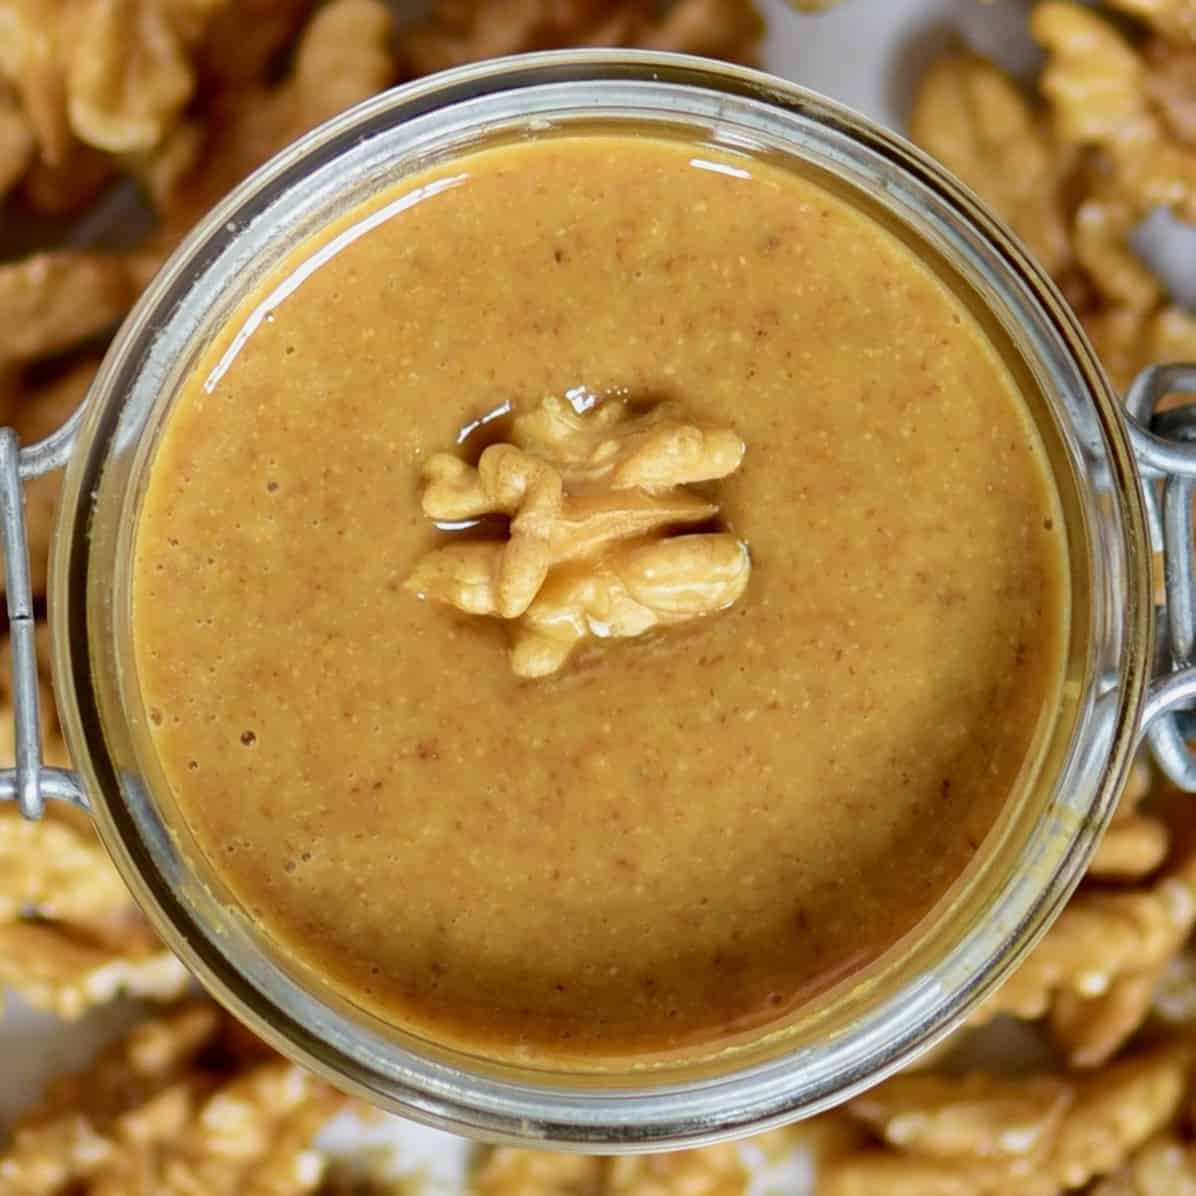
One of the most surprising revelations for first-time makers is the unparalleled texture of homemade walnut butter. Unlike the often dense and sticky textures of peanut or almond butter, walnut butter consistently emerges smoother, more buttery, and even runnier, offering a melt-in-your-mouth experience that is truly distinctive. It's a "VIP addition" to your pantry, elevating everyday meals and snacks into something special. Furthermore, while store-bought walnut butter is often scarce and commands a premium price when found, making it at home is not only incredibly satisfying but also remarkably cost-effective. You're not just creating a delicious spread; you're investing in your health and your wallet. If you're curious about how this homemade delight stacks up against other popular choices, dive deeper into
Why Homemade Walnut Butter Outshines Almond & Peanut Butter.
Crafting Your Own Silky Smooth Walnut Butter: The Easy Recipe
The beauty of making **simple homemade walnut butter** lies in its minimalist approach. At its core, you truly need only one primary ingredient: walnuts, and one essential piece of equipment: a high-speed food processor or powerful blender.
What You'll Need:
- Raw, Unsalted Walnuts: This is non-negotiable for the best results. Raw walnuts break down more easily into a smooth butter. While you *could* use pre-roasted walnuts in a pinch, they might require longer blending times and potentially a tiny bit of added oil (which we strive to avoid). You have the option to use them raw, soak them (which can aid digestion and result in an even creamier texture), or lightly roast them (for a deeper, nuttier flavor profile). If roasting, spread them on a baking sheet and bake at 350°F (175°C) for 7-10 minutes, allowing them to cool completely before proceeding.
- A Pinch of Salt (Optional, but Recommended): Technically optional, but a small amount of sea salt works wonders. It not only enhances the natural, earthy flavor of the walnuts but also helps to neutralize some of their inherent bitterness, resulting in a more balanced and palatable butter.
- High-Speed Food Processor or Powerful Blender: This is where the magic happens. A robust motor is crucial for transforming walnuts from solid nuts to a creamy butter. While a mid-level machine can get the job done, expect it to take longer and require more frequent breaks to prevent overheating the motor.
Step-by-Step Instructions:
- Prepare Your Walnuts: If you chose to soak or roast your walnuts, ensure they are completely dry (for soaking) or cooled (for roasting) before proceeding.
- Load the Processor: Add your walnuts to the bowl of your high-speed food processor or blender.
- Begin Blending: Start processing the walnuts. Initially, they will break down into coarse crumbs. This is normal!
- Patience is Key: Continue to process. The walnuts will transition through several stages:
- Stage 1: Crumbs (1-2 minutes): Fine, powdery crumbs will form.
- Stage 2: Clumpy Paste (3-5 minutes): The crumbs will start to clump together, forming a thick, pasty consistency.
- Stage 3: Thick Butter (5-8 minutes): The paste will begin to smooth out, releasing its natural oils and forming a thick, spreadable butter.
- Stage 4: Silky Smooth Butter (8-15 minutes or more): With continued processing, the butter will become increasingly smooth, shiny, and runny. This is the desired consistency for a truly luxurious walnut butter.
- Scrape Down the Sides: Throughout the entire process, stop the machine frequently (every 1-2 minutes) and use a spatula to scrape down the sides of the bowl. This ensures even blending and helps the walnuts process more efficiently.
- Season to Taste: Once your walnut butter has reached your desired consistency, add a pinch of salt if using, and pulse a few more times to incorporate it thoroughly. Taste and adjust if necessary.
For more insights into keeping your spread pure and delicious, check out
Whip Up Oil-Free Walnut Butter: Healthy, Silky Smooth, & DIY.
Troubleshooting Tips:
- My machine is struggling/overheating: If you're using a less powerful machine, give it frequent breaks (30-60 seconds every 2-3 minutes) to prevent overheating.
- It's not getting smooth: Be patient! It truly takes time for the walnuts to release their oils. Keep scraping down the sides and continue blending. Resist the urge to add oil unless absolutely necessary (e.g., if using very dry walnuts). If you must, add a *tiny* drizzle of neutral oil like walnut or a high-quality olive oil, but only as a last resort.
Elevate Your Walnut Butter: Flavor Variations & Creative Uses
While the natural, slightly earthy, and buttery flavor of plain walnut butter is delicious on its own, its inherent mild bitterness also makes it a fantastic canvas for various flavor enhancements. Don't hesitate to experiment!
Fun Ways to Flavor Your Walnut Butter:
- Sweet Delights: Stir in a drizzle of maple syrup or honey, a dash of vanilla extract, a pinch of cinnamon, or a few soft dates for a naturally sweetened version. Cacao powder can transform it into a rich chocolate walnut butter – reminiscent of sophisticated chocolate liqueurs.
- Spiced Sensations: A pinch of pumpkin spice, cardamom, or even a dash of ginger can add warmth and complexity, especially lovely for colder months or holiday gifting.
- Savory Twists: For an unexpected yet delicious spread, consider adding a hint of smoked paprika, garlic powder, or nutritional yeast (for a cheesy flavor) if you plan to use it in savory dishes or dressings.
Creative Serving Suggestions:
Your homemade walnut butter is incredibly versatile.
- Classic Spreads: Enjoy it slathered on toast, bagels, rice cakes, or English muffins.
- Breakfast Booster: Swirl it into oatmeal, yogurt parfaits, or smoothies for an extra creamy texture and nutrient boost.
- Baking & Desserts: Use it as a base for energy balls, no-bake cookies, or as a decadent filling for tarts and pastries.
- Savory Applications: Whisk it into salad dressings for a creamy, nutty base, or use it to thicken sauces for grain bowls.
- Edible Gifts: Pour your freshly made walnut butter into small, attractive jars, tie with a ribbon, and you have a thoughtful, healthy, and unique edible gift, perfect for the holidays or any occasion.
Storage Tips:
Store your **simple homemade walnut butter** in an airtight container in the refrigerator. It will typically last for 2-3 weeks. Over time, some natural oil separation may occur; simply give it a good stir before each use.
Making your own **simple homemade walnut butter** is a rewarding culinary adventure that delivers exceptional flavor, incredible health benefits, and unparalleled freshness. By transforming "nature's healthiest nut" into a velvety smooth spread, you're not just creating a delicious pantry staple; you're embracing a healthier, more flavorful lifestyle. So, grab your walnuts and your food processor, and prepare to be amazed by this truly special occasion nut butter that you can enjoy any day of the week!